Installing Fedora on Macbook Air
March 11, 2017
Preface
I never was a fan of laptops, I mean 2000s era laptops, the ones that were bulky, heavy and hard to upgrade. The last point was especially important to me because in the 2000s you had to upgrade your station, add more RAM, more HDD, and newer CPU. You followed Intel’s Tick-Tock schedule, chosen Tock ones, and got a performance boost (according to benchmarks).
But recently, all of a sudden I’ve realized that I have a 4-year-old machine with Intel i3 CPU and it’s fine. I don’t feel the need to upgrade. Partly it’s because I’m not using a Windows for a long time. On my Fedora, I mostly sit in the terminal without desktop environment like Gnome or KDE, edit text in Vim and that’s all I need. The heaviest thing on my machine - the browser - is working fine too, I can play a 1080p youtube video, I can load bloated sites.
The other part that saves me from the upgrade is that hardware itself is not improving vertically, but rather horizontally. Simply switching to the newer CPU will not make your computer life full of magic and unicorns - just compare Haswell and Kaby Lake CPUs. The only thing that increased in the clock rate and might gain you some performance is the bus speed that was increased from 5 GT/s to 8 GT/s. All the other things are about attaching more stuff on your CPU - more memory, more I/O devices. And the funny thing is that 3-year-old Haswell from 2014 costs the same $310 as new and shiny Kaby Lake. I’m not saying that the progress in CPUs has stopped, there is a servers market, there are a gaming market and HPC market that needs and feels all these developments. I’m saying that for consumer machines like desktops there is no need to upgrade often.
So there is a rare need to upgrade your machine now and recent laptops are nice, light and hold battery for at least 8 hours. So when I got an option to get a laptop at my job, I took it. The problem was that it was a Macbook Air.
And I’m a Linux guy, so I had to install Fedora on this stuff. I don’t care about you guys whining “…but macOS is so much better and friendly and nice and blah-blah…”. No. It’s not. Well, it’s not for me. I have a simple and efficient setup that serves me extremely well, looks gorgeous for me and don’t interfere with my work. It doesn’t mean that I didn’t try - I did, but working in macOS without tiling WM, strange keyboard shortcuts (you can’t set Alt-Shift to switch keyboard layout) and fake user-friendliness (I dare you to tell me how to show hidden files in Finder) make me dog slow.
So I’ve decided to install Fedora on Macbook Air and because it’s a little bit tricky, I wrote this guide. In the end, we’ll have a laptop with:
- Dual boot macOS and Fedora
- Working multimedia keys
- Working brightness control including keyboard brightness
- Working laptop lid close/open
Preparations
Because we’ll leave macOS we have to prepare Macbook. Thanks to the UEFI advancement in the Linux we don’t need rEFIt/rEFInd - modern distros are installed as a breeze. So the only thing we have to do is shrink macOS partition and prepare USB stick.
Make partition for Linux
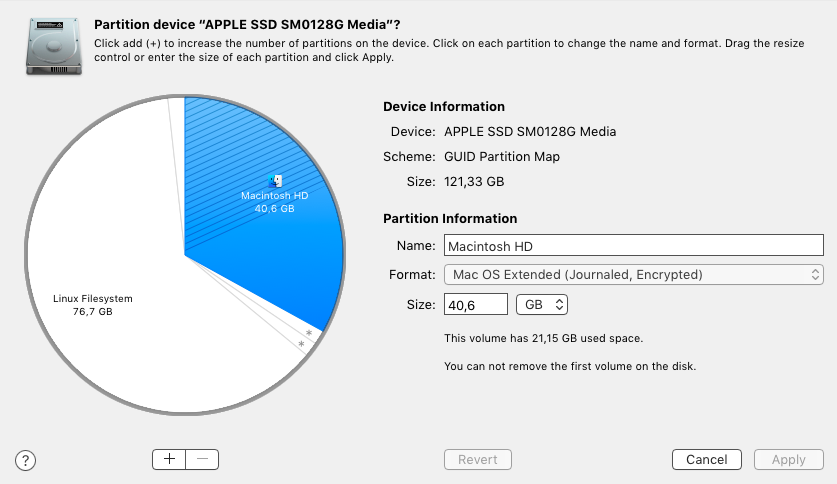
My Macbook has only 128 GBs of SSD and I’ve decided to leave macOS on it, so I need to partition the drive leaving some usable amount of space for macOS. I don’t have any experience with macOS and thought that 40 GBs will be enough even if I will use it.
To partition the drive I’ve used “Disk Utility”. Just press ‘+’ button and set the desired size for the new partition. Leave ‘Format’ default (“Mac OS Extended (Journaled)”) because you’ll anyway format it with ext4. Then hit ‘Apply’ and that’s it.
Here is mine, though it’s already after I’ve installed Fedora.
Create USB stick
First of all, you can’t use Fedora netinst image, because there is no working open source driver for Broadcom WiFi card that is installed in Macbook Air. So choose a full image that doesn’t require an internet connection like MATE or Gnome.
Now, you have to create USB stick with Fedora. There is a tool called “Fedora Media Writer” that will make bootable stick on macOS but, unfortunately, I’ve failed to boot with it. It seems that after repartitioning on macOS it immediately mounts the new partitions and touch it making it somehow unusable for installation.
So I’ve created USB stick on Linux with simple
$ dd if=Fedora-Workstation-netinst-x86_64-25-1.3.iso of=/dev/sdd bs=1M oflag=direct
Now for the installation part.
Fedora Installation
Boot into USB stick
Insert USB into Macbook, hold “alt” key and press power button still holding “alt” key until you see boot choice menu with Fedora.
MOST IMPORTANT! Linux partitions and installation destination
After booting from USB you’ll see usual Anaconda installer. First and most important we must configure installation destination.
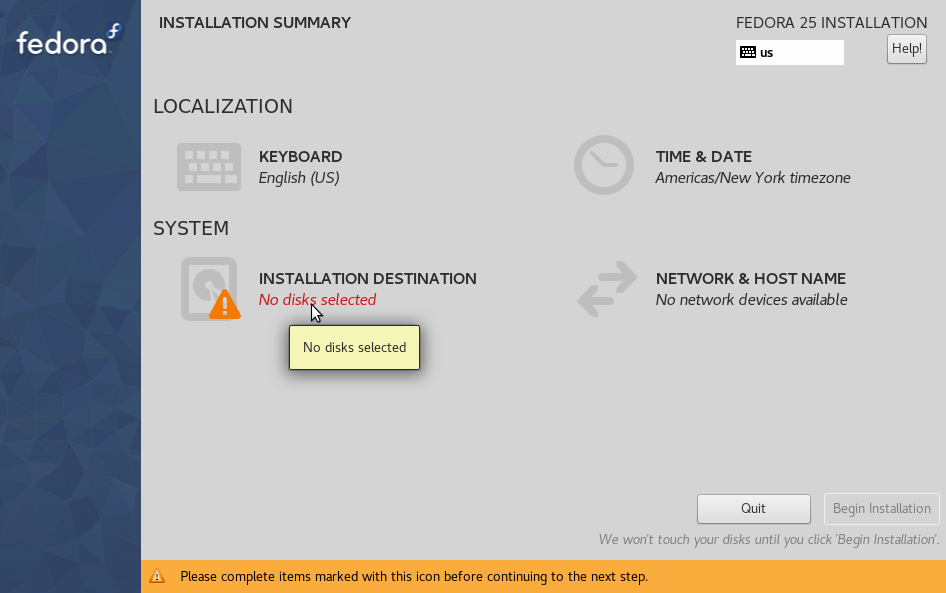
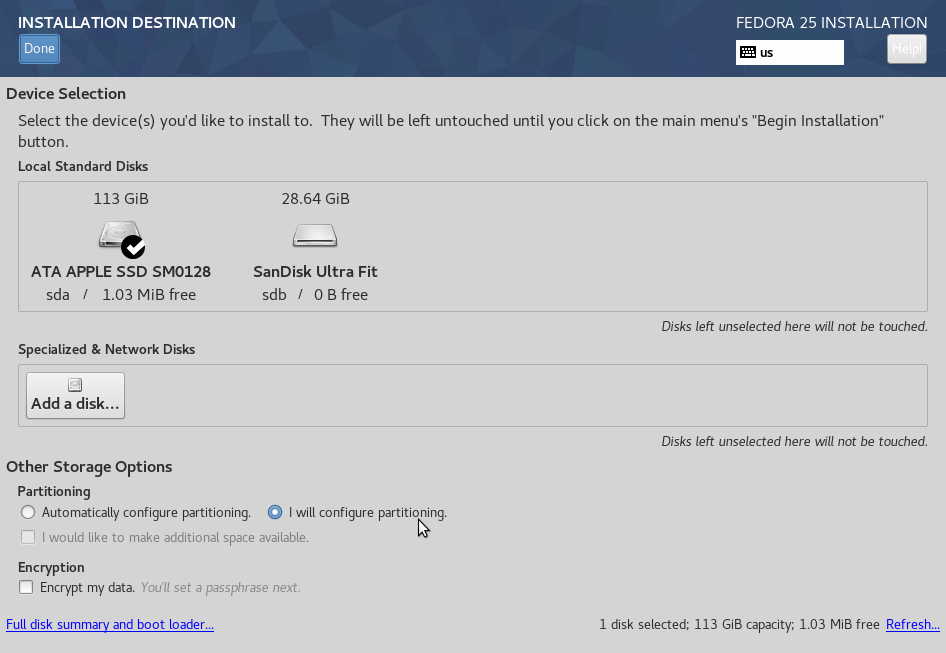
Enter this menu, choose “ATA APPLE SSD” and then choose “I will configure partitioning” and click “Done” in the top of the window.
Expand “Unknown” widget, find your 80 GBs or 74 GiBs partition of type “hfs+” and delete it. Now you’ll see 74 GiBs of available space in the pink rectangle at the bottom.
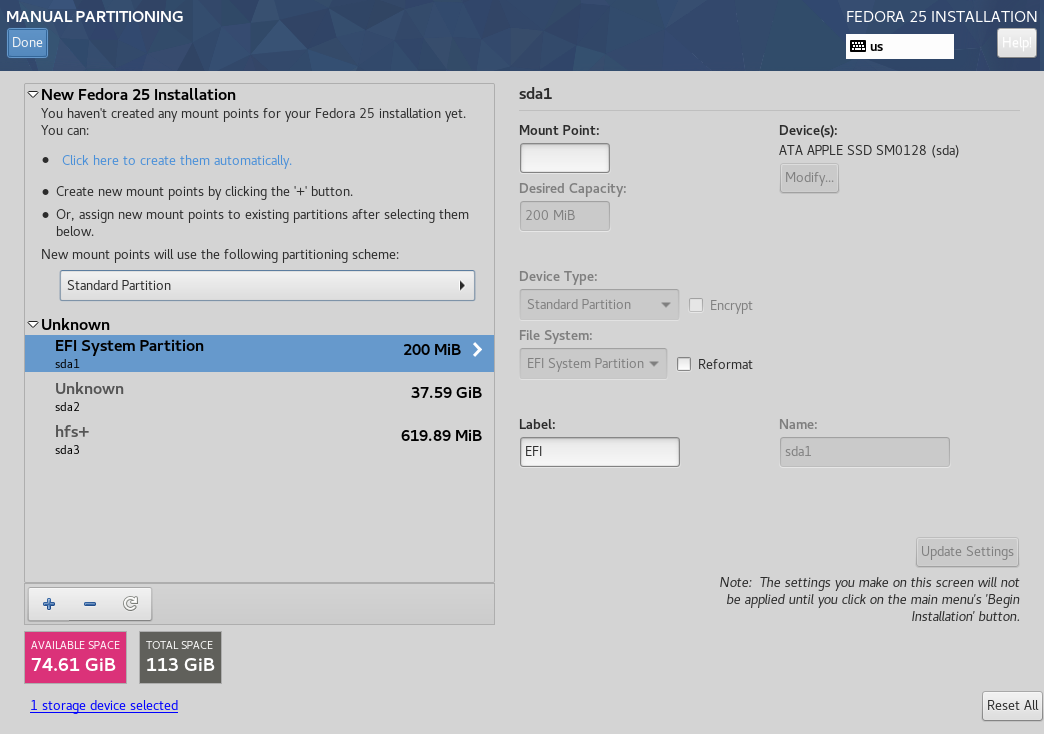
Now choose “Standart Partition” scheme from the dropdown menu in “New Fedora 25 Installation” widget, and then click on the link “Click here to create them automatically”.
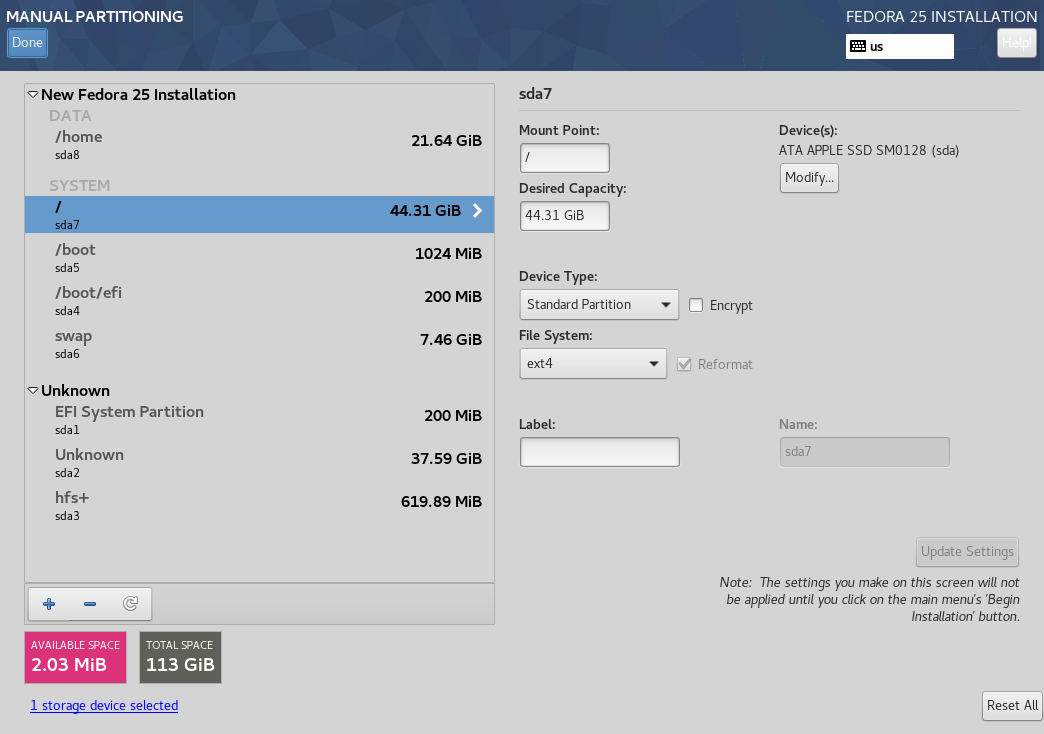
It will create separate / and /home partitions and also a whooping 8 GBs swap. You can tweak automatically created scheme at your taste, just don’t touch “/boot/efi” partition or otherwise it won’t boot. I’ve changed swap size to 2 GBs, removed /home and / partition and manually add / partition to span all available space of almost 80 GBs.
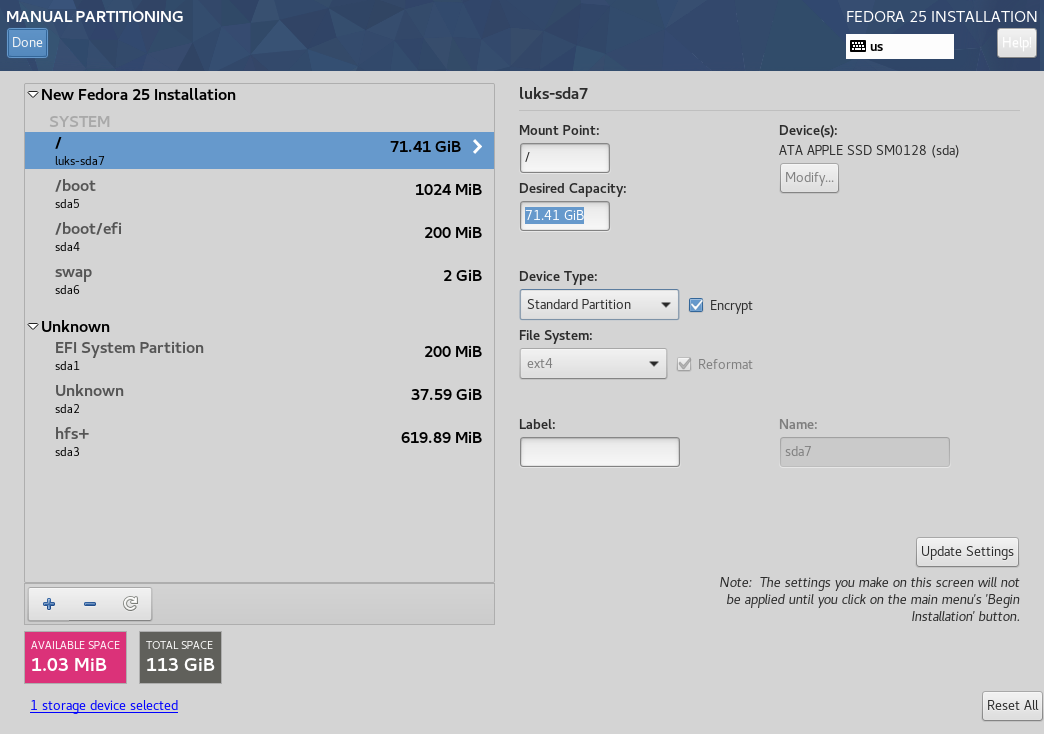
Also, I setup LUKS encryption for my partitions, because it’s a laptop after all, if I lose it you won’t be able to steal my stuff by directly connecting the SSD drive. Also, LUKS encryption doesn’t make any performance penalty.
Then hit “Done” and confirm your disk layout.
Configure installation
Now when you have partitioning configured, just setup your installation with Anaconda.
To make hardware work nicely like brightness control and lid close/open install some DE like MATE in my case. DEs have decent udev rules and configs for hardware. It also setup display manager (the one that asks for the login and password) and X server. It’s amazing how everything works out of the box. Something like 5 years ago it was a pain to make mic and brightness work and now you just don’t worry. Kudos to distro and DE guys!
You can stick with MATE but I’ll install and configure i3 window manager over MATE.
Wait until installation is done
and then reboot into your fresh Fedora by holding “alt” key.
Install WiFi drivers
Macbook Air has crappy proprietary Broadcom WiFi chips. To make it work you’ll need an alternative network. You can use USB to Ethernet cable, or, as in my case, you can use your Android phone as a modem. No seriously, just attach your Android phone, select Modem mode and you’ll immediately see the network connected.
Now, when you have a network, to install Broadcom WiFi drivers open root terminal and do the following:
# Enable RPM fusion repo
dnf install https://download1.rpmfusion.org/free/fedora/rpmfusion-free-release-$(rpm -E %fedora).noarch.rpm https://download1.rpmfusion.org/nonfree/fedora/rpmfusion-nonfree-release-$(rpm -E %fedora).noarch.rpm

# Install packages
dnf install -y broadcom-wl akmods "kernel-devel-uname-r == $(uname -r)"

# Rebuild driver for your kernel
akmods

# Load the new driver
modprobe wl
After that, you’ll have WiFi working.
Making things nice (for me)
Now it’s time for tweaking. My favorite!
Enable fnlock
By default, function keys are working as multimedia keys. To revert it back to the functions we have to enable so-called fn lock.
Create file /etc/modprobe.d/hid_apple.conf as root and add the following to
it:
options hid_apple fnmode=2
Don’t try to remove hid_apple kernel module - your keyboard stop working. Just reboot.
Infinality patches
Infinality is a set of patches for fontconfig that makes fonts looking gorgeous. I dare you to try it - after it, anything else will look like a crap including macOS fonts:
dnf copr enable caoli5288/infinality-ultimate
dnf install --allowerasing cairo-infinality-ultimate freetype-infinality-ultimate fontconfig-infinality-ultimate
Getting my configs
Because Linux software is awesome and has text configs, I store most of them in Dropbox and put known and loved configuration by simple copying or symlinking.
Install headless Dropbox:
cd ~ && wget -O - "https://www.dropbox.com/download?plat=lnx.x86_64" | tar xzf -
And put dropbox CLI client to your ~/bin folder:
mkdir -p ~/bin && cd ~/bin && wget https://www.dropbox.com/download?dl=packages/dropbox.py
Now launch it with dropbox start.
Installing i3 for MATE
Ok, so before that I was using MATE and while it’s nice I prefer tiling WM, namely i3. I install it with dnf:
dnf install i3
and then copy or symlink ~/.i3 directory with the configuration in my Dropbox. But what is really awesome is that we can use i3wm instead of MATE’s window manager
- Marco. This way we’ll have all the niceties of DE like working multimedia buttons and brightness control while using our slick and nice tiling WM.
To change MATE’s window manager just issue these 2 commands under your user (no need for sudo):
dconf write /org/mate/desktop/session/required-components/windowmanager "'i3'"
dconf write /org/mate/desktop/session/required-components-list "['windowmanager']"
Logout and login and you’ll have it!
To exit from i3 as a window manager for MATE, use this in your i3 config
bindsym $mod+Shift+q exec "mate-session-save --logout"
Settings
Everything else I configure with mate-control-center.
Conclusion
So the hardest part in installing Fedora on Macbook Air is partitioning and WiFi driver. Everything else just works!
After using this setup for a couple of months I can say that it’s great. There are things that I wish could be better, but it’s mostly about hardware. Like screen is crappy 1440x900 and keyboard is way too limited (no separate home/end, have to use fn+left/right). I would rather use some lightweight Thinkpad. But anyway, the freedom to move your workspace with you is amazing, so I think I’ll never buy a desktop machine anymore.